Flag denotes the Shrine of the Bear Spirit.
Gates denote Charr barricades.

This article has an associated Zaishen Challenge Quest.
Overview[]
- Light the sacred altar. Lead the bear spirit into Bjora Marches to cleanse Jora's homestead. (disappears from Quest Log after speaking to the bear spirit)
- Accompany Bear on the mountain pilgrimage to the Shrine of the Bear Spirit.
- Defeat the Charr forces surrounding the Shrine of the Bear Spirit.
- Receive the Ursan Blessing [sic] from the Shrine of the Bear Spirit.
- Use the bear spirit skill, Ursan Force, to break down the Charr barricades.
- Kill the Charr in Jora's homestead. 5...0 groups remaining.
Obtained from
- Automatically added after completing Flames of the Bear Spirit
- After first completion, can be obtained from:
- Bear Spirit in Jaga Moraine (after capturing the sacred altar)
- Scrying Pool in Hall of Monuments (select "I seek guidance" option)
Requirements
Follow up
Rewards[]
Mode Experience
pointsNorn reputation points First time Repeats Normal 2,500 1,000 1001 Hard 1,500 150
- 1 Only if below rank 8.
Walkthrough[]
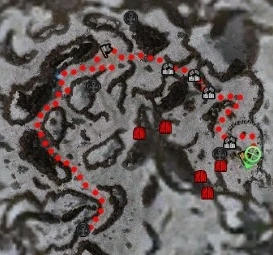
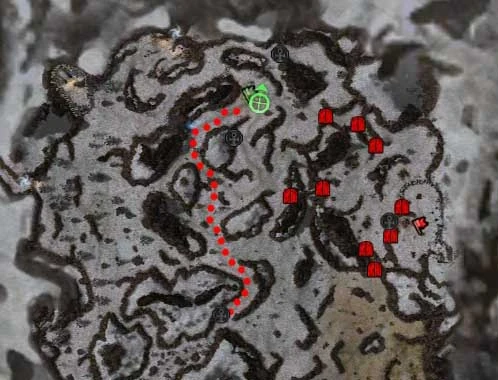
Location of bosses and Shrine
Head to the Sacred Altar in Jaga Moraine to summon the Bear Spirit. The altar is initially owned by mobs, and you must capture it. Each character within range of the altar provides one pip of capture speed toward the altar, with mobs and your party members canceling each other out. Arctic Nightmares will spawn to attack as you try to capture the altar if Flames of the Bear Spirit is active, but not on subsequent runs if you repeat the mission. Altar capture speed is capped at four pips, and if you spend enough time capturing it, it will go from fully controlled by mobs (full red bar) to fully controlled by you (full blue bar). Beware of the Arctic Nightmares' skill Consume Flames, they will use it often to reduce your altar capturing progress, and killing them is the best way to mitigate the skill's effect. Capturing the altar makes the Bear Spirit appear, speak to her to initiate the quest and then walk through the portal to Bjora Marches.
Fight your way through the Charr, Mandragor, and Elementals on your way to the Shrine of the Bear Spirit. The shrine is guarded by three groups of Charr, each with a boss. The groups follow patrol patterns that make them easy to pull apart from each other. After defeating all three groups, click on the shrine to obtain the temporary skill Ursan Aura.
Head for Jora's homestead, and use Ursan Aura to allow you to destroy the barricades blocking the path to the Charr with Ursan Force. Because Ursan Force is needed, it is necessary for at least one player in the party to pick up Ursan Aura. Destroy all five groups of Charr to complete the quest. After a cutscene, the party will be returned to Gunnar's Hold.
There are two ways that the quest can be shortened when repeated. First, you can start from Longeye's Ledge and run across Bjora Marches to the Sacred Altar. There is no need to stop to talk to Egil Fireteller, as that is part of Flames of the Bear Spirit and not this mission. Second, if someone in the party brings Ursan Blessing (a weaker but permanent version of Ursan Aura available from A Hunter's Pride), it can be used to destroy the Charr barricades without needing to go to the Shrine of the Bear Spirit and kill the bosses.
Hard mode[]
There are vastly more Vaettir guarding the Sacred Altar area in hard mode, and they are much stronger. Vaettir have extremely high armor and significant self-healing, so it can take a while to wear them down, and their heavy health degeneration can put a considerable strain on your healers. One group of four is manageable, but two at a time is not.
Most of the Vaettir can be avoided by starting from Longeye's Ledge and running through Bjora Marches to get to Jaga Moraine, but this is only helpful if you have completed the Flames of the Bear Spirit quest before. It isn't necessary to fight anything in Bjora Marches, as the mobs move slowly and are rather spread out. Once in Jaga Moraine, approach the Sacred Altar from the East side and try to capture from the edge of its range. If you're lucky, you can sneak in, capture the altar, make the Bear Spirit appear, talk to the her, and then go back to Bjora Marches to start the mission proper.
If you're not so lucky, you'll aggro Vaettir in the process. There are several linked groups of four that can wander near enough to the Sacred Altar to aggro on you there. Most of them will be far enough, but it's likely that at least one will come too close. If you aggro any, immediately run away to the East and pull the group you aggroed with you to where there is more room to fight. If you stay near the altar and fight, party members scrambling around will likely aggro additional groups and cause a wipe. If multiple groups follow you, run all the way into Bjora Marches and then come back to reset the instance and try again.
Once back in Bjora Marches for the mission itself, hard mode greatly increases the level of most mobs. There are a number of groups of three Charr or five Mandragor that patrol long distances with overlapping routes. It helps immensely to pull only one group at a time, though two groups of Charr at a time is still manageable. Charr Flameshielders deal considerable area damage with Fire Storm and Meteor Shower, so it can help to spread out and/or interrupt them. You may need to wait for a convenient time to pull a single group, or pull a group far out of its route to get it out of the other patrol routes.
If you follow the route on the map, you'll only have to fight one Mandragor group, but it's quite dangerous, still. The Dreamroot Mandragor uses Fevered Dreams, and the others spread a lot of conditions, which can easily get four or five conditions on your entire party at once, including dazed. You'll end up with a lot of conditions almost no matter what you do, and removed conditions will very quickly be reapplied. Flagging your party apart will at least mean that some party members are relatively safe. Kill the Dreamroot Mandragor first, as its Fevered Dreams is what makes the group so dangerous. Beware of the Mandragor Scavengers' numerous traps as well, as they are a large source of conditions, but can be avoided.
The easiest way to run this mission in Hard Mode is to have somebody with Ursan Blessing so that you do not have to go near the shrine. A minion master can also improve survivability.
When fighting the five groups of Charr at the end, be aware that Charr Dominators have Resurrection Chant. They must be killed quickly, or else they will continually resurrect anything else that you kill. Most of the groups have two Charr Dominators, but usually no healers. The group with the boss Elmohr Snowmender has only one Charr Dominator, but it also has a monk boss that is a very powerful healer, making it the hardest group. It helps to kill the Dominator first, then the Flameshielder, and then the boss.
Creatures[]
NPCs[]
Monsters[]
- Charr
 20 Charr Axemaster
- 20 Charr Blademaster
- 20 Charr Bladestorm
- 20 Charr Seeker
- 20 Charr Prophet
- 20 Charr Mender
- 20 Charr Hexreaper
- 20 Charr Dominator
- 20 Charr Wardkeeper
- 20 Charr Flameshielder
- 20 Charr Avenger
- Elementals
- 24 Frozen Elemental
- 28 Avalanche
- Mandragors
Bosses[]
- Charr
- 24 Tenagg Flametroller (Eviscerate)
- 24 Docu Kindleshot (Barrage)
- 24 Elmohr Snowmender (Healing Light)
- 24 Kakei Stormcaller (Mind Blast)
Dialogues[]
Briefing from the Scrying Pool.
| Quest Log: | "Charr infest Jora's ancestral lands like a blight on the landscape, devouring her family honor as the locust devour the farmer's crops. With the strength of the bear spirit, remove this infestation and help Jora reclaim her homestead as well as her honor." |
| Accompany Bear on the mountain pilgrimage to the Shrine of the Bear Spirit: | |
|---|---|
| Egil Fireteller: | "The Charr are formidable, but with Bear's blessing you will defeat them." |
| Egil Fireteller: | "Up these mountains, we will find a shrine that holds great power." |
| <party leader>: | "How will this shrine help us defeat Charr?" |
| Egil Fireteller: | "The shrine channel's Bear's strength into those it deems worthy. Lead us there, and Bear shall bestow this blessing upon you for the coming fight." |
| Defeat the Charr forces surrounding the Shrine of the Bear Spirit: | |
|---|---|
| Egil Fireteller: | "The shrine amplifies and focuses Bear's power. Stand your ground while I perform the blessing." |
| <party leader>: | "Hold fast! The Charr are coming!" |
| Receive the Ursan Blessing from the Shrine of the Bear Spirit: | |
|---|---|
| Egil Fireteller: | "It is done. The spirit infuses you with Bear's power." |
| Egil Fireteller: | "Call forth Bear's strength! Unleash the beast within you and let its fury purge the Charr from these lands!" |
| <party leader>: | "We will cleanse the land. No Charr shall escape our wrath." |
| Kill the Charr in Jora's homestead: | |
|---|---|
| <party leader>: | "Clear the Charr from this camp! Leave none standing!" |
Cutscene 1[]
| Blood Washes Blood | |
|---|---|
| Gwen: | "Now that felt good!" |
| Ogden Stonehealer: | "Jora, now that we've helped you . . ." |
| <party leader>: | "Hold on a moment, Ogden." |
| <party leader>: | "Jora, are you all right?" |
| Jora: | "Yes. Bear is pleased with what we've done this day." |
| Ogden Stonehealer: | "Pleased enough to help us?" |
| Jora: | "I will continue to aid you." |
| Ogden Stonehealer: | "I mean, will the other Norn help?" |
| Jora: | "That is for each of them to decide." |
| Ogden Stonehealer: | "Can't we just rally your people and raise an army to fight the Destroyers?" |
| Jora: | "The Norn do not use armies. We fight alone, as true warriors should." |
| Ogden Stonehealer: | "But we helped you!" |
| Jora: | "And I will help you, Dwarf. I will speak to the others. But whether they help or not is their choice, not mine." |
| Ogden Stonehealer: | "It will take forever to raise an army one Norn at a time." |
| Jora: | "The Norn do not need armies." |
| Ogden Stonehealer: | "The Great Dwarf save me!" |
| <party leader>: | "You know, he's only worried about his people." |
| Jora: | "I know. But he must understand. Norn are not like Dwarves or men. We fight our own battles, our own way." |
| <party leader>: | "I think I understand." |
| Jora: | "And that is why you lead." |
Notes[]
- If you fail the mission or resign, you will return to the border between Bjora Marches and Jaga Moraine with all of your Death Penalty removed. You can then summon the bear spirit again and re-attempt the quest without having to run across Bjora Marches again.
- Unlike the time limited Ursan Blessing, Ursan Aura lasts until you invoke the Totem of Man and does not require an elite skill slot.
- The mechanics of capturing and lighting the sacred altar are similar to those used elsewhere in game, e.g. the rifts during the Grand Court of Sebelkeh.
| Eye of the North storyline quests |
|---|
Ebon Vanguard: Against the Charr → Warband of Brothers → Assault on the Stronghold Asura: Finding the Bloodstone → The Elusive Golemancer → Genius Operated Living Enchanted Manifestation Deldrimor: Destruction's Depths → A Time for Heroes |